When the summer season starts to tail off, a lot of discussion in the pontoon community will be about effective winter storage solutions, with shrink wrapping quite a popular method. (If you are instead looking for vinyl wrapping, check out this stunning pontoon wrap designs.)
But how do you shrink wrap a pontoon boat for the winter?
I have never done this before, but what I did find was an excellent instructional video online which goes into great detail on how to do it properly. The video is shown below and is then followed by some notes from me that I have taken from the video with some additional screenshots.
The link is here: http://dr-shrink.com/shrink-wrap-marine-recreation
What You Will Need
- Staple gun
- Strapping
- Wood
- Plastic caps
- Super caps
- Buckles
- Strap tensioning tool
- Belly band
01. Prepare the Pontoon for Storage
The first thing you should always do is get the pontoon boat prepared for storage.
That means taking everything off including any portables, standalone electronic equipment, and particularly food!
Also take down the Bimini and get it laid flat, as the shrink wrap is going to be completely covering this area and will get pulled down tight. We also don’t want any tears to appear on sharp corners or railings.
02. Create the Support Structure
Providing the Bimini has been laid flat, you start off by measuring the highest point of your pontoon boat. You can see what I mean in the picture below.
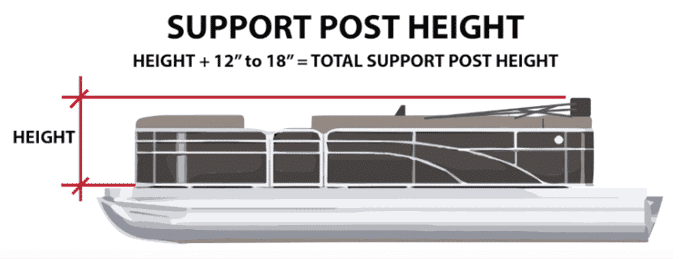
The highest point will in most cases be the top of the console windscreen or the flattened Bimini.
Once you have that highest point, add 12 to 18 inches to it.
The height you have now calculated is how high the support posts are going to be.
You can now build the support posts, which will have a plastic top and bottom cap.
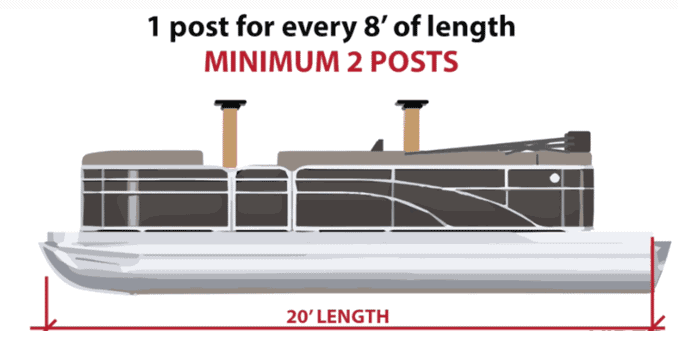
The amount of support posts you need to make equates one for every eight feet of length your boat is. You should have at least two support posts as the bare minimum for your pontoon shrink wrapping project.
Once you have created your support posts and they have been cut to the right length, secure the top and bottom support caps to them.
Now you can move onto setting up the strapping structure using the pontoon side railings as anchor points, with the strapping leading from the rails to the top of the support poles.
This process is going to create a stable structure for the shrink wrap to cover over.
Pull the strapping as tight as possible and then staple it into the tops of the support poles.
Then you strap from the stern and bow of the pontoon boat until you have a tent shaped design.
Now that the sub-structure frame is complete you can move onto the actual shrink wrapping process itself.
03. Install the Shrink Wrap
Drape the shrink wrap onto your pontoon, and over the support frame and strapping from the stern towards the back, unfolding it as you go.
Once the boat is completely loosely covered with shrink wrap you can cut any excess off that is hanging down at the bottom over the trailer.
Now run the belly band around the perimeter of the pontoon boat just under the deck where your two pontoons are secured to the deck.
Now attach a buckle and using a strap tensioning tool connect the two ends of the band and start to tighten it all up.
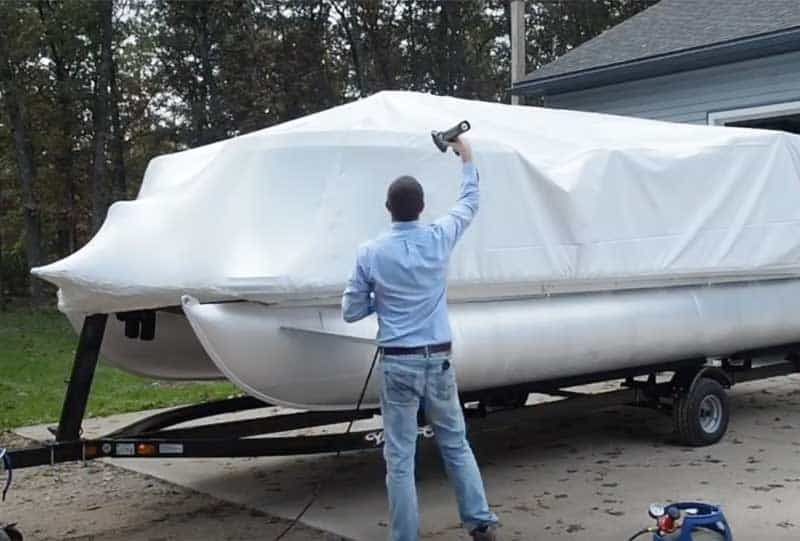
You can now start to heat and shrink the wrap over your pontoon boat.
Fold the wrap over the perimeter band and start to heat and shrink, securing that bottom area with bands, running under the deck.
This will keep the shrink wrap in place as the rest of the wrap is shrunk.
You can now start to shrink the entire cover using the heat gun.
Use steady and even strokes heat the wrap in sections to avoid section, starting at the bottom and then moving to the top.
Now the entire cover is shrunk, tape over any seams to ensure a tight seal for the season.
04 Add Vents to the Shrink Wrap
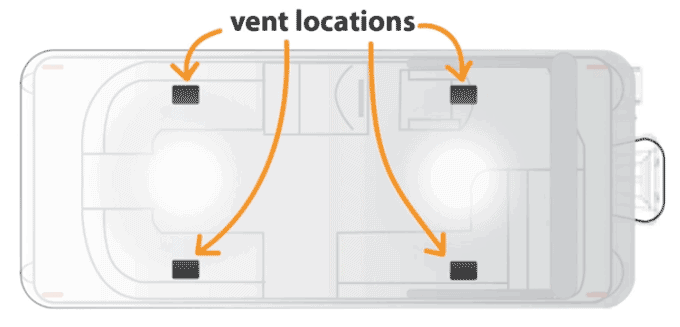
To avoid moisture build-up whilst in storage, you should always add vents to the shrink wrap on the pontoon boat.
The vents will also come as part of the Dr Shrink package, as for most pontoon boats they recommend placing 4 vents into the shrink wrap cover.
As an optional extra you can also add an access zipper point should you need to access to your pontoon interior during the storage season. Watch the video in full for details on how to do this.
You have now successfully shrink-wrapped your pontoon boat.
Do You Need to Build a Frame?
Yes, the support structure and frame is very important as it will create the structure over which the shrink wrap is placed.
It will also help to protect the boat against snow and other weather elements when in winter storage.
Handy Hint: This is just one part of the pontoon winterization process. Click that link to see the other steps you should be taking each year.
Safety Advice
This shrink wrap can burn. If heat is applied incorrectly, shrinkwrap can ignite into open flame. It can also drop down on to other combustible material and cause secondary ignition and fire.
If at any time you observe the shrinkwrap on fire, immediately stop what you are doing and carefully inspect the area where you are working for a possible fire. Keep a fire extinguisher available at all times!
Handy Hint: You can see what marine fire extinguisher I recommend in my comprehensive list of pontoon boat safety items every boat owner should have.
Inspect the cover for up to 30 minutes after shrinkwrapping to look for hot spots.
If the wind is blowing more than 10 miles per hour, do not shrink the cover! Always use ladders tall enough to that the surface to be shrunk is visible.
Please Note: I have no affiliation with the Dr Shrink company and have never used their products before. However, of all the guides available online there’s is undoubtedly the best and their marine shrink wrapping products have an excellent reputation so worth checking out.