
Cruising along on your pontoon boat has been compared to having your living room out on the water. It’s like having a floating lounge but combined with the comfort of modern living and the unbeatable feeling of being in the great outdoors.
A large part of that comfortable feeling is having carpet underneath your feet. It will be cooler than vinyl flooring and can offer a good non-slip grip if you’re pulling in a catch.
But here’s the thing; that luscious carpet can have a short lifespan, becoming grimy and smelly. You might have oil stains, mold, mildew, black or orange marking, plus it can start to lift and ridge over time.
In this guide, I am going to explain to you the best way in which you can learn how to replace carpet on a pontoon boat with a brand-new carpet and the steps you will need to take.
Handy Hint: This guide won’t show you how to replace carpet with vinyl flooring, as that’s a different thing all together. You can see what the differences between vinyl and carpet are here.
The detailed steps below include how to remove the carpet, how to prepare your pontoon boat, how cut the carpet to size, what glue to use and how to make sure the end result looks professional.
How to replace carpet on a pontoon boat
Follow each of the steps below. You might want to print this out so you can lay the guide down on the deck in your pontoon as you do the job.
What you will need
- DIY budget boat carpet (view on Amazon)
- Carpet knife (view on Amazon)
- Carpet scraper (view on Amazon)
- Floor sander tool (view on Amazon)
- Adhesive glue remover (view on Amazon)
- Coarse sand paper
- Boat carpet glue (view on Amazon)
- Heat gun – optional (view on Amazon)
1. Clear the deck and work space
Don’t rush into replacing your pontoon boat carpet, as that’s when the big mistakes can happen. Spend some time clearing a workspace around your boat and on the pontoon deck.
I speak from experience as I’ve lost tools, stubbed my toes, and cut my fingers because I failed to prepare.
Also make sure to move your pontoon boat to a more open space if possible. At the very least clear a few feet of space around the boat and trailer.
2. Isolate any electrics
There is always a risk of getting an electric shock whilst you are removing and pulling up the old carpet to be replaced. You never know if there are wires running under the carpet, so to be safe, disconnect the leads from the battery before continuing.
When you remove the console later (if required) you will also need to work with some power cables, so removing the battery first is good idea.
3. Remove equipment and gear
This might seem obvious, but before you try to remove the pontoon carpet, make sure you remove all equipment and gear from the deck.
For example, on some pontoon boats the seats will need to be removed as they might be bolted over the carpet. If you try and work around all this, it’s going to make the job a lot harder and you might end up with a very ugly end result.
Your carpet replacement project could stretch over a few days, so store all the loose gear under a tarp or under a roof.
Handy Hint: If you need any new gear for your pontoon boat, visit the recommend products section to see what I have customized my ride with over the last few years.
With bolts and nuts, get some freezer bags or similar. Write the name of the piece of equipment on a slip of paper and put all the bolts, nuts and screws related to it in that bag. This way you won’t mix them up with the fasteners or any other pieces of equipment.
Once all the chairs and loose equipment are removed from the boat you might also need to remove railings, lights and the Bimini if they are going to get in your way when pulling up and replacing the carpet.
If you do need to remove your Bimini, take care to disconnect the anchor light first.
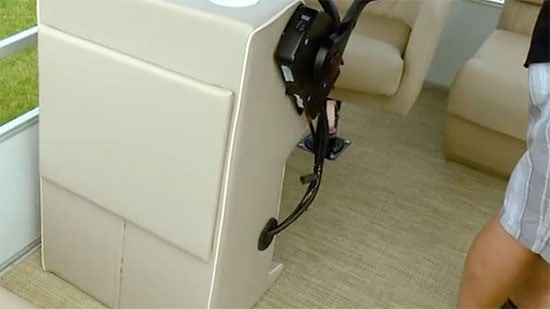
Removing your console might also be necessary. It’s really tricky, so make sure that after loosening the console, you loosen the cable harness before trying to take it out.
If there are wires with no plugs, clip the wires but make sure you label them. Do this by using a small piece of masking tape and wrap it around each end of the cable. You can then just cut and write matching numbers on them to assist future connection.
You may also need to disconnect the steering cable. Look for a small clip that will disconnect the cable from the steering mechanism.
The cable will most likely be covered in grease so make sure you wrap it in plastic so that it does not dirty your new carpet later in the process.
4. Remove the carpet

![]() This part of the carpet replacement project takes time. It’s fiddly, labor-intensive, and not without its challenges. Make sure you are ready for some hard work!
This part of the carpet replacement project takes time. It’s fiddly, labor-intensive, and not without its challenges. Make sure you are ready for some hard work!
There are different methods you can use for pulling the carpet up, but the way I did it was to take a carpet knife (this is the knife I used) and cut long strips into the carpet, about 6 inches in width.
When you pull up the old carpet there will be lots of torn carpet and glue still left over.
By doing this, it will let you apply a much larger force on a smaller surface area, thus make it easier to pull off in a moment.
Handy Hint: Carpet knives are very sharp! Always cut away from yourself because if you are cutting towards yourself the knife can slip, and you can injure yourself.
You can now start to pull the old carpet up in strips. By doing it in smaller strips, it not only makes the job easier, but also means you can dispose of the strips easier by folding them into your vehicle to take to the dump.
When you are pulling the carpet make sure you are on a stable footing. If the carpet suddenly gives way or tears you could lose your balance and fall.
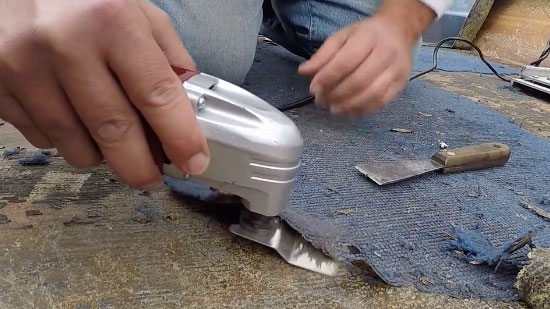
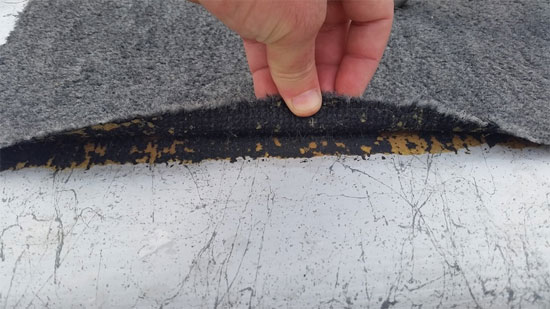
Use a carpet scraper to get as much of the old carpet up as possible.

![]() One thing; if the carpet is really hard to take up, and is stuck on fast like the photo above, you can use a carpet scraper tool which will do the job in minutes. Here’s a carpet scraper on Amazon that works like a dream.
One thing; if the carpet is really hard to take up, and is stuck on fast like the photo above, you can use a carpet scraper tool which will do the job in minutes. Here’s a carpet scraper on Amazon that works like a dream.
5. Remove the old glue and prepare the deck surface
There will always be some glue left on the deck. It’s really hard to get it off but can be done if you have the right tools.
I wrote a separate guide on removing carpet glue from your deck; you will need to remove as much glue as possible so there are no lumpy spots on your new carpet and that the new carpet sticks properly to the deck.
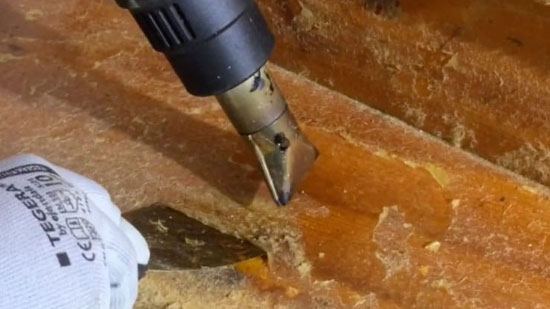
You can use a heat gun and scraper combined to get better results when taking the glue off the deck.
But in a shortened format, this is what you do:

 a) Sand the glue marks off with a floor sander tool

The Bosch Random Orbit Sander is an excellent choice for this, with outstanding reviews. (Be cautious, as sanders can remove too much material if you’re not careful).
 b) Use an adhesive remover

If there is any glue is still left on the deck, apply an adhesive glue remover such as Goo Gone (view Amazon prices).
Once the deck is clean, roughen the surface up with some coarse sand paper, this will allow the glue to fill into those tiny scratches and result in a stronger bond.
Handy Hint: If you have an aluminum deck, removing the glue will be easier compared to taking up from wood. For aluminum flooring, a heat gun will work wonders when combined with scraper tool. I’ve also used one with a wooden deck too, so decide what you might need.
6. Fitting and installing the new replacement carpet
All that hard work to clear the deck and remove the carpet and glue is now going to pay off as we now look to fit the replacement carpet. Here’s a budget DIY boat carpet you can buy on Amazon.

![]() Start by measuring out how much carpet will be needed. You can do this by cutting the carpet slightly larger than measured. It is better to have too much carpet than too little. It will also let you trim down cleaner edges on the carpet once glued.
Start by measuring out how much carpet will be needed. You can do this by cutting the carpet slightly larger than measured. It is better to have too much carpet than too little. It will also let you trim down cleaner edges on the carpet once glued.
Lay the carpet over the deck to make sure that it covers the entire deck before applying any glue. This will also give you chance to cut out a hole to allow the cable harness and steering cable to stick through, this hole will be hidden so don’t waste too much time on it.
Once you have the carpet cut, ready, and you are confident that it fits, roll the carpet up, with the side that will be glued down on the outside of the roll.
It’s now time to place glue down on the deck floor.

![]() You will need a marine grade carpet glue (view a great glue on Amazon). If you use something else, then the carpet could come loose after a few days.
You will need a marine grade carpet glue (view a great glue on Amazon). If you use something else, then the carpet could come loose after a few days.
Start by spreading the glue around the deck. The glue manufacturer recommends a surface area to volume of glue; typically, a gallon of glue will cover an 8’ x 10’ floor area.
We can now lay the new replacement carpet down.
Begin laying the carpet from one end of the boat, i.e. from bow to stern.
As you roll the carpet out onto the glue take some time to push out any bumps in the carpet to make a smooth surface.
You can make this easier by using a rolling pin or a piece of steel pipe. Take note of the curing time of the glue as you don’t want it to dry before you have finished laying the carpet down, also note that a hot day can accelerate the drying.
If you are worried about it drying, apply glue as you go.
Handy Hint: Walking around on the carpet before it has cured can ruin your smooth surface.
Once the glue has set you can begin trimming off all the excess carpet. You can then use a staple gun to staple the carpet around the perimeter. This is just an added precaution though, and is an optional step.
7. Re-assemble the gear and equipment
The marine carpet glue you use will have a drying (curing) time on it, so make sure you let it settle. I would put an extra 2 hours on top of what the glue manufacturer says just to be sure.
Once dry, you can begin to re-install any equipment you had to remove.
That time we took earlier to organise the fasteners into separate bags will now pay off. You won’t need to scrounge around for the correct bolt or screw.
Make sure to add the equipment back in the same order you removed it and double check all electrical connections.
And that’s it.
You should now know how to replace a carpet on your pontoon boat. I hope it works for you, and you’ve found this guide helpful.
Related questions on pontoon carpet replacement
Here are some additional questions I often see people asking on pontoon boat forums and Facebook groups, with my personal opinion on what’s best.
Should you choose carpet or vinyl flooring?
Vinyl has come a long way in emulating the feel of look of carpet, making it an ideal replacement for carpets.
It is much easy to clean and maintain. However, carpets still beat out vinyl if cost saving is your goal.
There’s a lot of different opinion in the carpet versus vinyl debate. You can read not just my opinion, but also that of other pontoon boat owners in my article on carpet versus vinyl.
Vinyl is a great option, but it will be more expensive.
Here is a selection of those comments from other boat owners:
“For me it’s carpets all the way if your boat is stored out of the weather. All the new pretty vinyl flooring products will give you third degree burns after it’s in the sun for a few hours. And I am speaking from experience of having been burned on vinyl!”
“We live in Florida, and in that salt water environment I don’t think you could really make any choice other than vinyl flooring, or one of the hard coat substitutes.”
“I used to have carpet on my pontoon boat, and it was terrible compared to the thick rubber backed vinyl. The water rolls right off the vinyl, my leg muscles aren’t sore after a long day standing on it like carpet, plus it looks amazing! That’s now 19 years with the same pontoon that looks brand new after a full restoration last spring. I literally I couldn’t be any happier with the results.”
How to clean a pontoon boat carpet
If your carpet is still salvageable then a good clean might be enough to breathe new life into it. You can read a full guide on how to get those nasty black stains out in my carpet cleaning guide.
In simple steps though, wet the entire carpet and then using a soft brush to scrub out any dirt. Add water again and apply soap to the carpet.
Once the soap is applied let it sit for a bit then wash it off with water while scrubbing and finally vacuum dry. I’ve put together a list of the best boat vacuum cleaners if you need some guidance on what products to use.
I also asked some other pontoon boat owners what their cleaning approach was. Here are some of their comments:
“I have an Encore made by Bentley. The carpet they use keeps water in it and I had a real algae problem. It almost looked like a forest sometimes! I purchased some algaecide from Walmart for pools then diluted it with water in a spray bottle at a 50/50 mix. I then sprayed on the affected area. It might change to a reddish color at first, but the next time you go out the algae will be gone. Works great for me. I keep the spray bottle on the boat.”
“I do the same. Mix pool algicide with a little water then spray until saturated, leave on for 24 hours or longer, then rinse it all out. This method has never damaged our carpet and it kills any algae and mold. I’ve been doing this on pontoons and houseboats that have been sat out year-round and where the carpet has got really bad.”
Why have carpet in your pontoon boat?
Pontoon boats come with one of two different deck types; either wooden or aluminum.
Having carpet down on the deck will give you traction under your feet, but also offers a luxury and comfort feel.
But one of the best reasons to fit carpet onto the deck is the noise. With aluminum decks, carpet will absorb a lot of noise from the water as it hits up under your pontoon.
How much does it cost to replace the carpet on a pontoon boat?
Carpet is the budget option. It’s way cheaper than vinyl.
The tools I recommend won’t cost you anything more than a couple of hundred dollars. The carpet itself will be the major expense.
The budget carpet I recommend in this replacement project can cost up to $500, but it’s all dependent on how much you need.
If you do decide to go down the vinyl flooring route, then it could cost anywhere between $300 and £1,200 dollars more to complete the project.
The last word…
Why pay a dealer to replace your pontoon boat carpet when you can do it yourself for a fraction of the price?
With most pontoon accessories and gear, as soon as you get the professionals involved, the cost can increase – many times doubling or trebling in cost.
If you have the time, tools, and passion for it, there’s no reason why you can’t replace the carpet by yourself over a weekend.
PS: I’ve just compiled a photo gallery of the best pontoon boat graphics ever seen – go take a look at some stunning photos!